Allpar Forums banner

2004 2.7 L Engine loose timing chain

6.5K views 9 replies 2 participants last post by  dalexop  
#1 ·
Hi folks,
Starting a new thread from my Cylinder Head Cover Gasket discussion. ( Which when fixed led to a loose timing chain issue when testing )
I have pulled the Primary Chain Tensioner and it retracts but its binding inside. I've ordered a new one and will test to see if this corrects the loose chain.
I am wondering if it will apply the correct tension right away, without loading up with oil ??
Note: I haven't removed the timing cover in case this is the issue. That way I avoid all the extra work, hopefully ?
.
 
#2 ·
The tensioner has some mechanical spring-tension outwards without the pressurized hydraulic extension. Once it has oil pressure and is hydraulically extended, it can only be retracted by pushing in on the check-ball.

There should be enough spring tension on the slack-side of the chain to hold the chain (make sure that the marks stay aligned) and prevent chain slippage.

Pull all 6 plugs and crank it over until the oil light goes out. Then the chain should be tight and you can finish the engine reassembly.

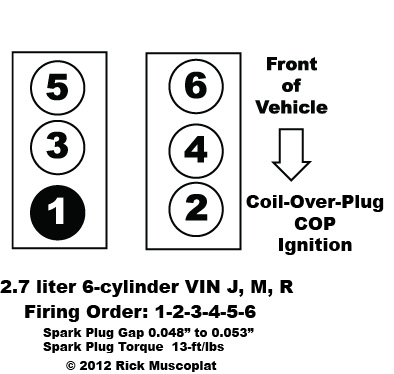
Be aware that #1 cylinder is on the passenger side and that you can verify TDC by a stem and dial indicator in the #1 plug hole.

Image
 
#3 ·
The tensioner has some mechanical spring-tension outwards without the pressurized hydraulic extension. Once it has oil pressure and is hydraulically extended, it can only be retracted by pushing in on the check-ball.

There should be enough spring tension on the slack-side of the chain to hold the chain (make sure that the marks stay aligned) and prevent chain slippage.

Pull all 6 plugs and crank it over until the oil light goes out. Then the chain should be tight and you can finish the engine reassembly.

Be aware that #1 cylinder is on the passenger side and that you can verify TDC by a stem and dial indicator in the #1 plug hole.

Image
Very interesting !
When I pulled the existing Tensioner, it was fully extended, past the indicator line, and full of oil
Would it have extended further once I took the tension off by removing it ?

It sounds like I still might be able to avoid taking the Timing Cover off if I ensure that the chain does not slip at all.
Although, I can only verify the timing marks on the Cam Sprockets at this point...

Do you recommend removing it ?
 
#4 ·
Can you get ahold of or borrow a dial indictor to get #1 at TDC? It would give peace of mind knowing that nothing has slipped and everything is in time before buttoning it up.

Image


If the tensioner was in fact, fully extended and the chain was still loose, then I sense something is wrong. Can you look down in the hole and make sure that the chain guides and water pump are ok?
For now, only turn the engine clockwise, as CCW could cause an untensioned chain to jump.
 
#5 ·
From what I can see, the Chain Guides are there along with the wear pads.
I can see the chain over the sprocket on top of the water Pump.

I'll test the new tensioner to see what difference it makes if any.
I'll hunt for a Dial Indicator as well
:)
 
#6 ·
Great news !
The new Tensioner made a huge difference.
The old one no longer had an O Ring nor C Clip when I pulled it out, so those parts are likely at the bottom of the oil pan.
:(

However, the chain lines up to the guides now which is nice to see.
I've removed the plugs and I am now looking for a Dial Indicator.

Did that Depth Gauge come with your kit ? It seems to be crucial given the distance from the plug hole down to the Piston Head.

Thanks again for all of your help :)
 
#7 ·
The dial indicator kit should have at least one extension for the stem. You just want to see the top of piston travel for TDC. I suppose it could be carefully 'eyeballed' for TDC without an indicator.

Image
 
#8 ·
Hi there Imperial.

I've finally had some time to verify the timing.
I'm using a Dowel as a depth gauge to verify TDC.
At this point:
1) #1 Cylinder is at TDC
2) Both Camshaft Timing Marks line up on Right and Left banks
3) The Chain is sitting on all guides and is not loose
4) The Camshaft timing marks are at all at 12 O'Clock, line up with the plated links, and there are 12 pins between both banks.

All looks good.

However !
The FSM States that the Number One Cylinder should be in the Exhaust Stroke.
The #1 Cylinder has both values closed and both lobes are pointing at 7 O'Clock and 5 O'Clock positions.

The #2 Cylinder has it's Exhaust value open and is at BDC.

Is this normal ?

Thanks again
 
#9 ·
The #1 should be TDC on the exhaust stroke. Roll the crank over 1 full turn. The cam sprockets may be 180Âş off?

ENGINE TIMING - VERIFICATION
Correct timing is critical for the NON free-wheeling designed, 2.7L engine. Engine timing can be verified by using the following procedures:

  1. Remove cylinder head covers.
  2. Rotate engine until number one cylinder is at TDC on the EXHAUST stroke.
  3. View the intake camshaft sprocket timing mark. The mark should be 90° from the cylinder head cover sealing surface on both right and left cylinder banks.
  4. Count chain pins from the mark on the intake camshaft towards the exhaust camshaft. Engine is timed correctly when there are 12 chain pins between the timing marks on the intake camshaft and exhaust camshaft.
  5. If marks are not correctly aligned, proceed to Timing Chain and Sprockets for service procedures.
 
#10 ·
hi there Imperial,
I wanted to close this thread with an update and express a great deal of thanks !

Your guidance helped me to pin point the problem, which was the Timing Chain Tensioner.
I followed the FSM page by page and ensured the timing was correct.
I did not remove the timing cover in this case, particularly given the chain sat correctly once the Tensioner was replaced.

I was able to assemble everything again and run tests.
Everything worked perfectly !

My engine test ran 30 minutes and everything seemed to be functioning well.
The engine ran smoothly and quietly.

Best regards,
Derek